
Front Page › Forums › AUDIO & TECHZONE › Tutorials › [GUIDE] Basis for creating Hip Hop/Rap using FL Studio
-
AuthorPosts
-
May 15, 2008 at 1:30 am #545897
Swag Factory EntParticipantWe are going to talk a little bit about the basics of creating a Hip Hop/Rap track in FL Studio.
First, the most basic part of a hip hop or rap track is the drums. In order for your song to be “Tight” you MUST have a tight drum beat to start with. The reason drums are so important is they decide the type of song it will be when it all comes down to it. The drums can make it sound like a “Crunk” song if you have some loud thumping bass and a super fast hat. If your kick is short and punchy with a little reverb and you have a steady tick with the hi hat and a couple of snare hits mixed in there, it will probably sound more along the lines of a sophisticated hip hop track.
Second, I need to talk about tempo. Most hip hop or rap tracks are in between 70BPM and 100BPM.
The third thing I will go over is making sure your song has an 8 bar chorus and the verses are 16 bars. This is the standard for the industry. Now, you may have 3 choruses and 2 verses in one song and another you may have 3 choruses and 3 verses. That is up to you, but each chorus should be 8 bars and each verse should be 16.
Remember: These are the basics, a starting point to getting where you want to be in the future.
Now that I have gone over a few things I am going to demonstrate these ideas.
I am going to start by making a basic drum pattern. I will start with a simple “Kick” and a “Clap”. The Tempo is at 88BPM.
Note: You should make the step sequencer 8 measures long instead of 4. Always do this no matter what. It’s simply the best way to start your ideas.
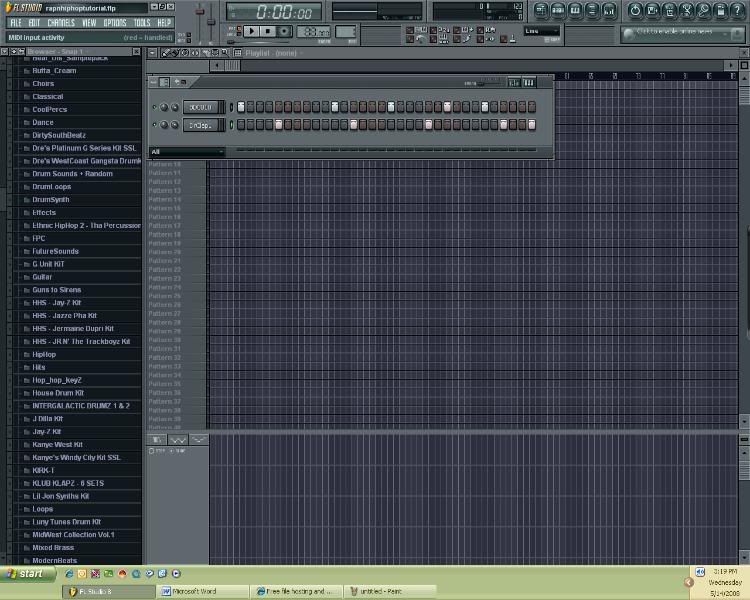
Now, I have a basic pattern down in the step sequencer, and I am going to add a, hi hat, to this pattern.
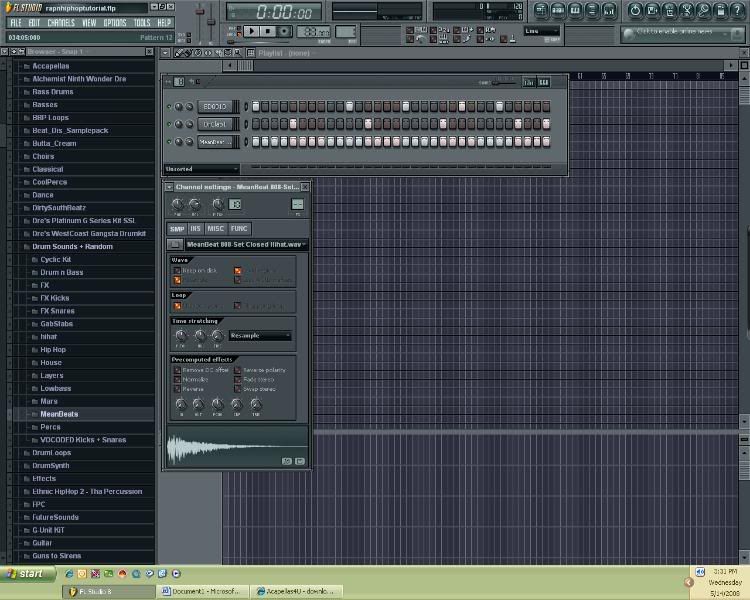
I have the Hi Hat filled in going as fast as it can, but it isn’t as fast as I want it to go. So, I am going to double its speed.
First you clone the channel, and fill it just like the other one. If you hit play they are both on the same beat.
Then I am going to go into the “FUNC” section of the cloned channel. Where it says “time” in the bottom left of the channel, you will see two knobs, a “GAT”, and “OFS” knob.
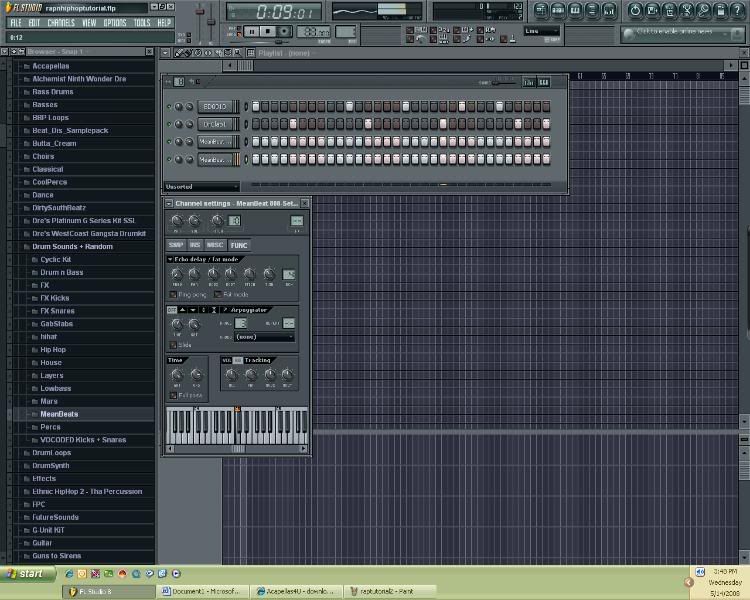
OFS adjusts when the sample hits in the step sequencer in one hundredths of a second. It tells you how many hundredths of a sec you are adjusting the offset in the top left corner of FL Studio. We are going to use the OFS knob, not the GAT knob, and adjust it until the second hi hat is where we need it. In this case, the Off Set is 0.12 secs.
Now the, hi hat, is at the speed I want it. However, I feel like the Hi Hat sample is too lengthy now that it’s going at such a fast speed. It sounds like the two channels are clashing with each other, so, to fix this I simply go to both channels and in the SMP are adjusted the “out” knob to around 25%. I also adjusted the volume on the cloned channel down a little bit to give it more of a “real” sound.
Now I have a basic idea down for my drums.
A big part of drums most people do not realize is the “Bass line”. The bass line of your project, no matter what kind of music it is, should go hand in hand with your drums.
The most IMPORTANT part of a project is keeping everything in tune. So if you haven’t read my tutorial on take the time to do so now.
For the bass line in this song I am going to layer this kick with a grimy synth.
Most of the time, if I have a long boom for my kick I will layer it and use it hand in hand with the bass line. If the bass goes up and down the kick goes with it. If the kick is short you can get away with a little more. Use your ears!!!!
I turned the, hi hat, off so I could focus on the bass line.
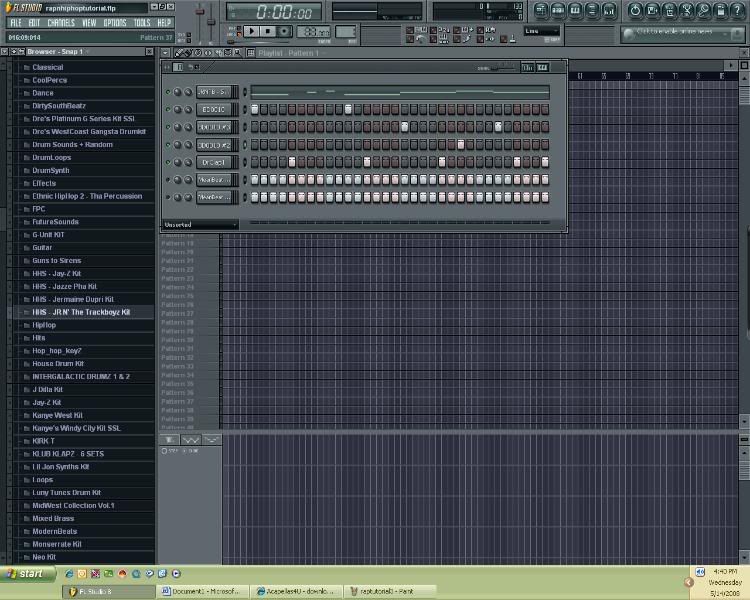
Now I have a very simple 3 note bass line. By three notes I mean I am using the same three keys in the piano roll, and just varying them between each other.
As you can see, I have cloned the Kick three times in order to follow the bass line (3 different kicks for a 3 note bass line). Although I have cloned the kick, and have them at different notes, the basic pattern is still the same.
The bass line almost acts like percussion in itself, hitting a few times where the kick doesn’t, giving the pattern more flavor.
Instead of having that same bass line repeating itself over and over again. I am going to make a second part to it which will be played in succession with each other.
Note: This is not a MUST it’s just what I am doing and what I think will sound good. There are many ways to do this by simply dropping out certain elements of the finished song and adding them back in.
All I am going to do is “clone” pattern 1 and create the second part of the bass line in pattern 2.
Here is pattern 2.
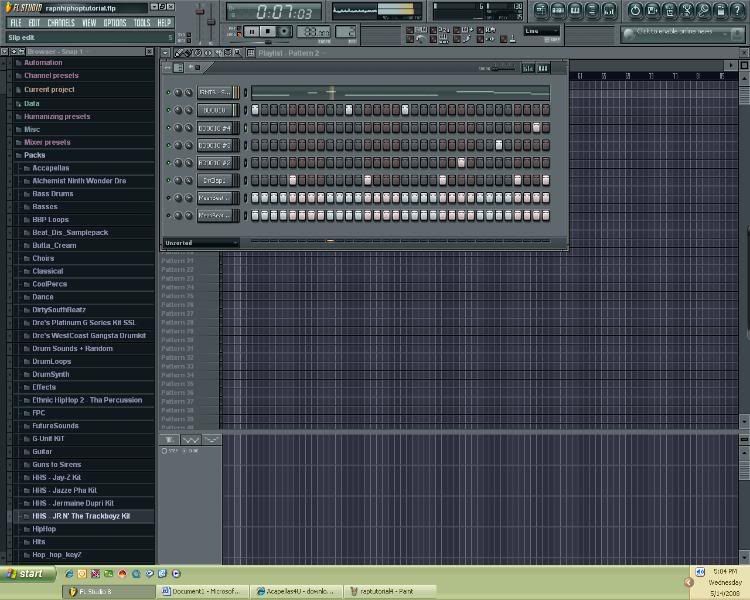
I basically used the same bass line for the first for measures in the piano roll, and ended up changing the last four measures. I did add one extra “Note” at the very end of this pattern, so, I decided to clone my original kick once more, and have the kick hit an extra time in pattern 2.
This is the two patterns playing together.
This is the two patterns playing with the, hi hat.
I am going to tweak the, hi hat, a little.
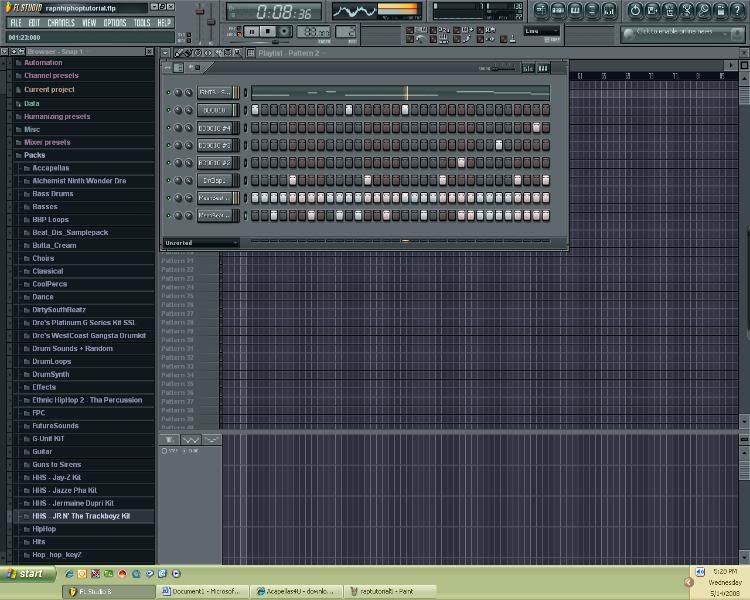
Now, how do you determine an 8 bar chorus and a 16 bar verse, how do you know how many patterns to put there?
We started our entire project with an 8 measure step sequencer. 8 measures is equivalent to 2 bars in a song. So, if you input 4 pattern 1’s and 4 pattern 2’s
you will have a 16 bar verse. Remember that is if the pattern is 8 measures long, if your pattern is 16 measures long then you will only need 4 patterns inserted into the playlist to create a 16 bar verse.I am not going to put what I have so far into the playlist yet, because the track is still very basic, and the arrangement, if I did it now, would most likely get changed once I start doing snare fills, getting the lead melody down, dropping out certain elements, etc.
Having said that, the two patterns I have made will serve as the basis for my entire project now. I will find an appropriate lead and any other instruments I might want to go along with it, and get the two patterns exactly how I want them.
When I am doing this I have the chorus in mind. These two patterns will be the first four bars of the chorus and most likely repeat for the second four bars of the chorus. Once that is done I will dissect these two patterns clone them as many times as necessary for the verse and drop certain elements out, add more, until the final draft is ready for exporting.
I wish I could give you a basis for creating leads in hip hop or rap music, but it’s entirely up to you! Whatever sounds good to you is what you should do. However, just keep in mind that when creating hip hop or rap music sometimes LESS is actually MORE. You don’t want to overload your project or beat with all of these instruments. When you do that you leave little or no room for the vocals which will be recorded over the track, and it all sounds like a mush when you do get done recording. Also, leads in hip hop, a lot of the time are almost treated like percussion. With very few note changes, but very catchy rhythmic wise. Because these leads are not very melodic, and more toward the rhythmic side, in order to keep it from sounding boring after 4 to 8 bars it may have the same exact rhythm and note value, but played an octave higher than before.
Also classic in hip hop and rap, in order to mark the transition into the second 8 bars or into the chorus, a lot of times there are long snare or tom fills. Even FX can be very useful for this as well as help keep it original and away from the norm.
These are some of the basics for creating hip hop in FL Studio. You need to have a solid drum beat to start with; the bass line should work with the drums flawlessly, and above all, make sure your project is all in KEY and in TUNE. Otherwise it will sound muddy; the bass will drown out other instruments and overall will not sound professional. This is the foundation of your production. It will serve as a platform for your leads, and the rest of your creative ideas.
AdSense 336x280May 15, 2008 at 1:30 am #649505
Swag Factory EntParticipantWe are going to talk a little bit about the basics of creating a Hip Hop/Rap track in FL Studio.
First, the most basic part of a hip hop or rap track is the drums. In order for your song to be “Tight” you MUST have a tight drum beat to start with. The reason drums are so important is they decide the type of song it will be when it all comes down to it. The drums can make it sound like a “Crunk” song if you have some loud thumping bass and a super fast hat. If your kick is short and punchy with a little reverb and you have a steady tick with the hi hat and a couple of snare hits mixed in there, it will probably sound more along the lines of a sophisticated hip hop track.
Second, I need to talk about tempo. Most hip hop or rap tracks are in between 70BPM and 100BPM.
The third thing I will go over is making sure your song has an 8 bar chorus and the verses are 16 bars. This is the standard for the industry. Now, you may have 3 choruses and 2 verses in one song and another you may have 3 choruses and 3 verses. That is up to you, but each chorus should be 8 bars and each verse should be 16.
Remember: These are the basics, a starting point to getting where you want to be in the future.
Now that I have gone over a few things I am going to demonstrate these ideas.
I am going to start by making a basic drum pattern. I will start with a simple “Kick” and a “Clap”. The Tempo is at 88BPM.
Note: You should make the step sequencer 8 measures long instead of 4. Always do this no matter what. It’s simply the best way to start your ideas.
Now, I have a basic pattern down in the step sequencer, and I am going to add a, hi hat, to this pattern.
I have the Hi Hat filled in going as fast as it can, but it isn’t as fast as I want it to go. So, I am going to double its speed.
First you clone the channel, and fill it just like the other one. If you hit play they are both on the same beat.
Then I am going to go into the “FUNC” section of the cloned channel. Where it says “time” in the bottom left of the channel, you will see two knobs, a “GAT”, and “OFS” knob.
OFS adjusts when the sample hits in the step sequencer in one hundredths of a second. It tells you how many hundredths of a sec you are adjusting the offset in the top left corner of FL Studio. We are going to use the OFS knob, not the GAT knob, and adjust it until the second hi hat is where we need it. In this case, the Off Set is 0.12 secs.
Now the, hi hat, is at the speed I want it. However, I feel like the Hi Hat sample is too lengthy now that it’s going at such a fast speed. It sounds like the two channels are clashing with each other, so, to fix this I simply go to both channels and in the SMP are adjusted the “out” knob to around 25%. I also adjusted the volume on the cloned channel down a little bit to give it more of a “real” sound.
Now I have a basic idea down for my drums.
A big part of drums most people do not realize is the “Bass line”. The bass line of your project, no matter what kind of music it is, should go hand in hand with your drums.
The most IMPORTANT part of a project is keeping everything in tune. So if you haven’t read my tutorial on take the time to do so now.
For the bass line in this song I am going to layer this kick with a grimy synth.
Most of the time, if I have a long boom for my kick I will layer it and use it hand in hand with the bass line. If the bass goes up and down the kick goes with it. If the kick is short you can get away with a little more. Use your ears!!!!
I turned the, hi hat, off so I could focus on the bass line.
Now I have a very simple 3 note bass line. By three notes I mean I am using the same three keys in the piano roll, and just varying them between each other.
As you can see, I have cloned the Kick three times in order to follow the bass line (3 different kicks for a 3 note bass line). Although I have cloned the kick, and have them at different notes, the basic pattern is still the same.
The bass line almost acts like percussion in itself, hitting a few times where the kick doesn’t, giving the pattern more flavor.
Instead of having that same bass line repeating itself over and over again. I am going to make a second part to it which will be played in succession with each other.
Note: This is not a MUST it’s just what I am doing and what I think will sound good. There are many ways to do this by simply dropping out certain elements of the finished song and adding them back in.
All I am going to do is “clone” pattern 1 and create the second part of the bass line in pattern 2.
Here is pattern 2.
I basically used the same bass line for the first for measures in the piano roll, and ended up changing the last four measures. I did add one extra “Note” at the very end of this pattern, so, I decided to clone my original kick once more, and have the kick hit an extra time in pattern 2.
This is the two patterns playing together.
This is the two patterns playing with the, hi hat.
I am going to tweak the, hi hat, a little.
Now, how do you determine an 8 bar chorus and a 16 bar verse, how do you know how many patterns to put there?
We started our entire project with an 8 measure step sequencer. 8 measures is equivalent to 2 bars in a song. So, if you input 4 pattern 1’s and 4 pattern 2’s
you will have a 16 bar verse. Remember that is if the pattern is 8 measures long, if your pattern is 16 measures long then you will only need 4 patterns inserted into the playlist to create a 16 bar verse.I am not going to put what I have so far into the playlist yet, because the track is still very basic, and the arrangement, if I did it now, would most likely get changed once I start doing snare fills, getting the lead melody down, dropping out certain elements, etc.
Having said that, the two patterns I have made will serve as the basis for my entire project now. I will find an appropriate lead and any other instruments I might want to go along with it, and get the two patterns exactly how I want them.
When I am doing this I have the chorus in mind. These two patterns will be the first four bars of the chorus and most likely repeat for the second four bars of the chorus. Once that is done I will dissect these two patterns clone them as many times as necessary for the verse and drop certain elements out, add more, until the final draft is ready for exporting.
I wish I could give you a basis for creating leads in hip hop or rap music, but it’s entirely up to you! Whatever sounds good to you is what you should do. However, just keep in mind that when creating hip hop or rap music sometimes LESS is actually MORE. You don’t want to overload your project or beat with all of these instruments. When you do that you leave little or no room for the vocals which will be recorded over the track, and it all sounds like a mush when you do get done recording. Also, leads in hip hop, a lot of the time are almost treated like percussion. With very few note changes, but very catchy rhythmic wise. Because these leads are not very melodic, and more toward the rhythmic side, in order to keep it from sounding boring after 4 to 8 bars it may have the same exact rhythm and note value, but played an octave higher than before.
Also classic in hip hop and rap, in order to mark the transition into the second 8 bars or into the chorus, a lot of times there are long snare or tom fills. Even FX can be very useful for this as well as help keep it original and away from the norm.
These are some of the basics for creating hip hop in FL Studio. You need to have a solid drum beat to start with; the bass line should work with the drums flawlessly, and above all, make sure your project is all in KEY and in TUNE. Otherwise it will sound muddy; the bass will drown out other instruments and overall will not sound professional. This is the foundation of your production. It will serve as a platform for your leads, and the rest of your creative ideas.
AdSense 336x280May 15, 2008 at 5:41 am #649517
what the funkParticipantAnother very good swag tutorial..
AdSense 336x280May 15, 2008 at 6:53 am #649518
Swag Factory EntParticipantI got bored for about 4 and a half hours lol!!! Glad you like it!
Im getting pretty good with Ozone 3 as well, I’m prolly gonna do a tutorial on it soon. Not a FULL tutorial tho LOL that would take forever, and I’m not close to even knowing half of ALL the stuff. Maybe a quick mastering tutorial or something.
AdSense 336x280May 15, 2008 at 1:43 pm #649541
what the funkParticipantI would be interested to read that, as i spend less and less time on production these days i tend not to stray far from the presets, one wrong move and blam you got a pile of shite on your hands.
AdSense 336x280May 15, 2008 at 6:18 pm #649559
LuminanceParticipantGreat tutorial!
AdSense 336x280May 16, 2008 at 12:54 am #649596
anisinaParticipantSwag, give an heads up to acapella about your tut’s and ask him to move them for you. You might get a little niceness in return.
 AdSense 336x280May 16, 2008 at 2:07 am #649602
Swag Factory EntParticipantWill do!!!!!!!
AdSense 336x280May 16, 2008 at 6:25 am #649610
icdigitalParticipantyeah, lookin forward for the ozone 3 tut too
AdSense 336x280March 20, 2009 at 1:23 pm #665696
DJUPLIFT25Participantsuper tutorial
AdSense 336x280November 12, 2009 at 12:35 pm #673993
KestevParticipantUseful again, thanks (y)
AdSense 336x280November 22, 2009 at 9:09 pm #674343
speakoner1ParticipantIm not sure if it worked when I turned the gat knob… o.O?
AdSense 336x280June 23, 2010 at 11:22 am #680453
lordghodaParticipanthe said OFS (offset) knob not gate knob :p. Anyways an interesting read (even tho i’m more into techno) but any info is useful info.. great tutorial 🙂
AdSense 336x280October 26, 2010 at 2:45 pm #683090
itsfallParticipantthx
AdSense 336x280December 12, 2010 at 7:22 am #684159
themachineragesParticipantThanks for the tutorial! Very helpful for those new to FL Studio like me.
AdSense 336x280January 2, 2011 at 6:39 pm #684656
zenmonkey760ParticipantGreat tutorial. I appreciate the textual tutorials so much more than the video ones. It makes things a lot easier to follow or look up when putting the skills into action.
AdSense 336x280April 28, 2011 at 5:18 pm #686969
LordbidParticipantthanks for posting the tutorial man!
AdSense 336x280January 6, 2014 at 5:01 pm #701555
mic_cimParticipantokay
AdSense 336x280 -
AuthorPosts
The forum ‘Tutorials’ is closed to new topics and replies.