
Front Page › Forums › AUDIO & TECHZONE › Tutorials › [TUTORIAL] Subtraction (using Audition) + few tips
-
AuthorPosts
-
December 27, 2006 at 3:54 pm #537328
totomParticipantHere’s a tutorial to show you how I perform any subtraction between an original song and its instrumental so I can get its acapella, and maybe acapella to get the instrumental (which is a bit harder). All that using Audition.
I’m also going to give a tip that will make beat mapping for acapellas simple — with a few steps required during the subtraction process in Audition — so you don’ have to beat map the acapella each time you want to use it or test it over one track.First, you’d rather take sources which are as clean as possible, the promo CD of a single or at least a CD rip if you can’t get the plastic object. To make an analog subtraction using two vinyls of a single, I suppose you have to be very precise and I’m not a specialist so I’ll let anyone else who knows better explain that. In that example, I first used a vinyl version of the single before getting a version coming from the promo CD (that’s why there are differences in the filenames at some point).
You can perform the subtraction like an ugly duckling — me in this example — using MP3 but in this case you’ll probably have to clean the result a bit, like I will explain during one step. Anyway, let’s begin:
Open the song you want to get the acapella from and its instrumental version in Audition. Go into Multi track mode and place them on 2 different tracks.

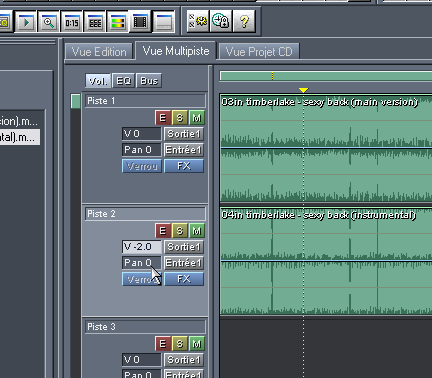
For the following steps, click on the "Hybrid" mode (red square in the pic above).
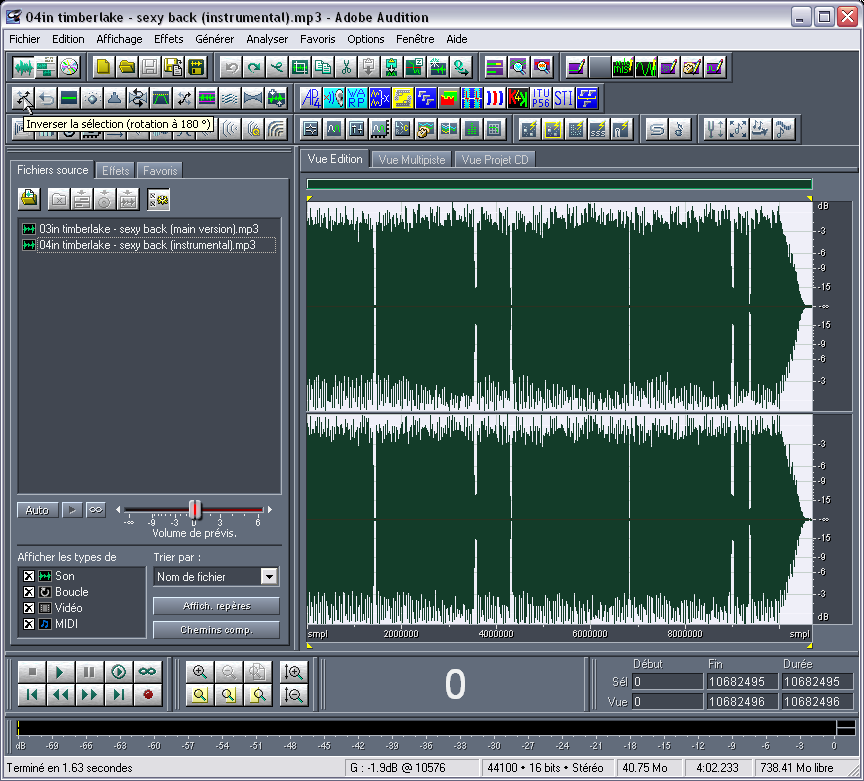
Double click on the instrumental to edit it and invert it vertically (the full track of course).

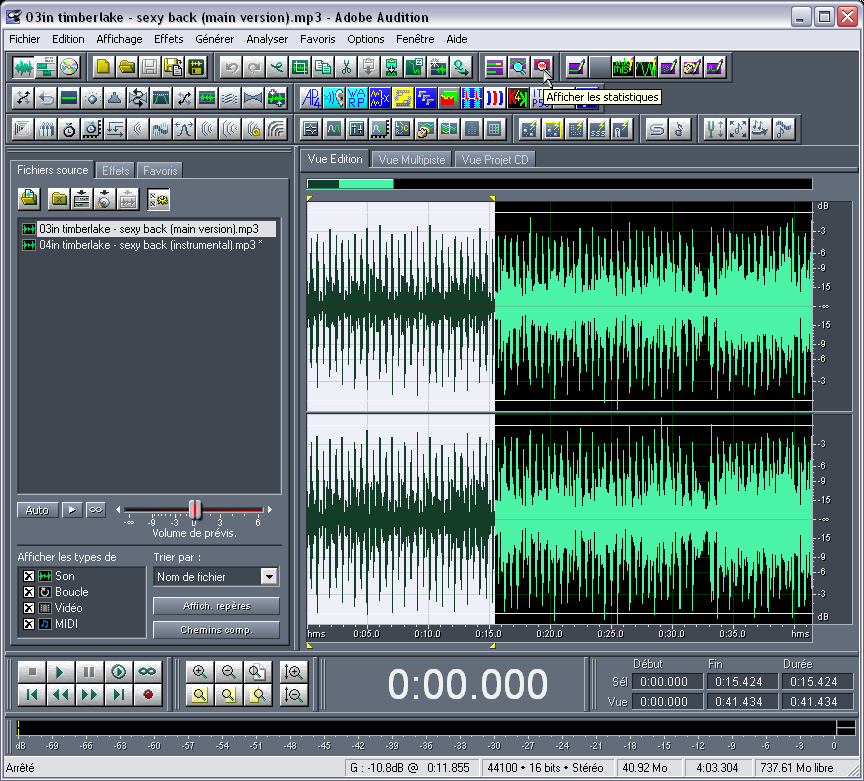
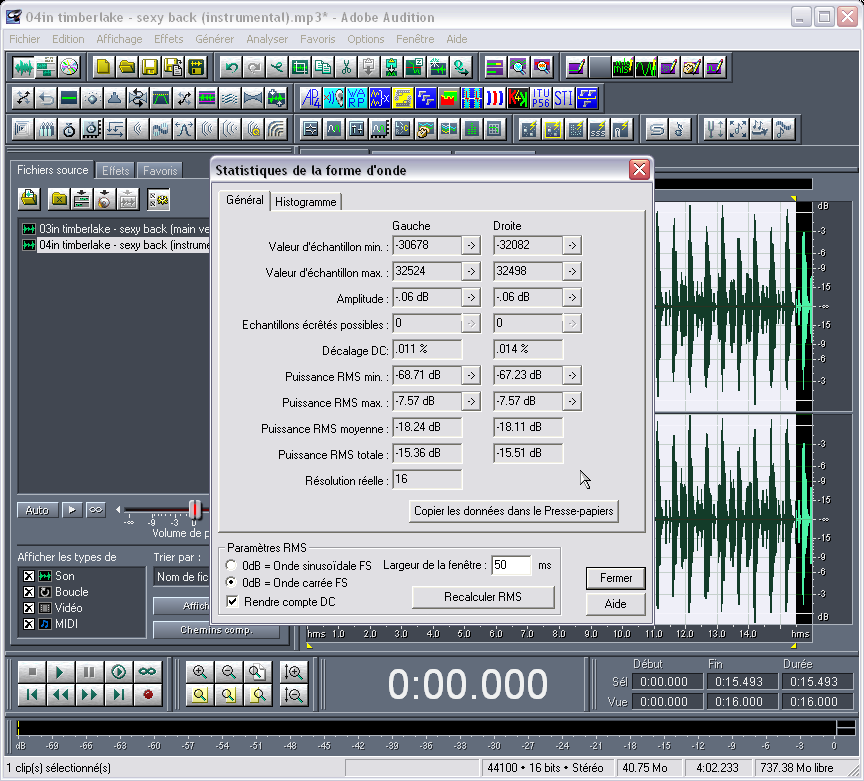
If the song and its instrumental are not the exact same volume, "Display the statistics" for 2 identical parts of the song (take the introduction before the vocals arrive).

Look at different RMS levels:


Here, we’ve got something close to 2 dB, so you just tweak the instrumental track level down by 2 dB (later we’ll be able to tweak it more precisely, following what we hear).

As we’re going to beat map the original track in order to get "beat mapping coordinates", we stick the original track right in the beginning of the multi track…

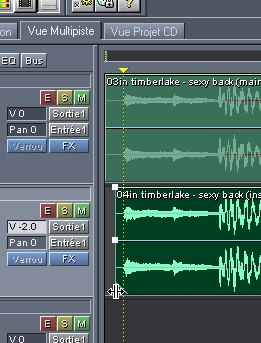
…then we cut enough off the beginning of the instrumental (left click on the limits) if that’s needed (negative offset).
Then we zoom on one of the first neat percussions (choose preferably a snare drum, which is more distorted (a.k.a. more into high frequencies) so it’s also easier to synchronize visually.

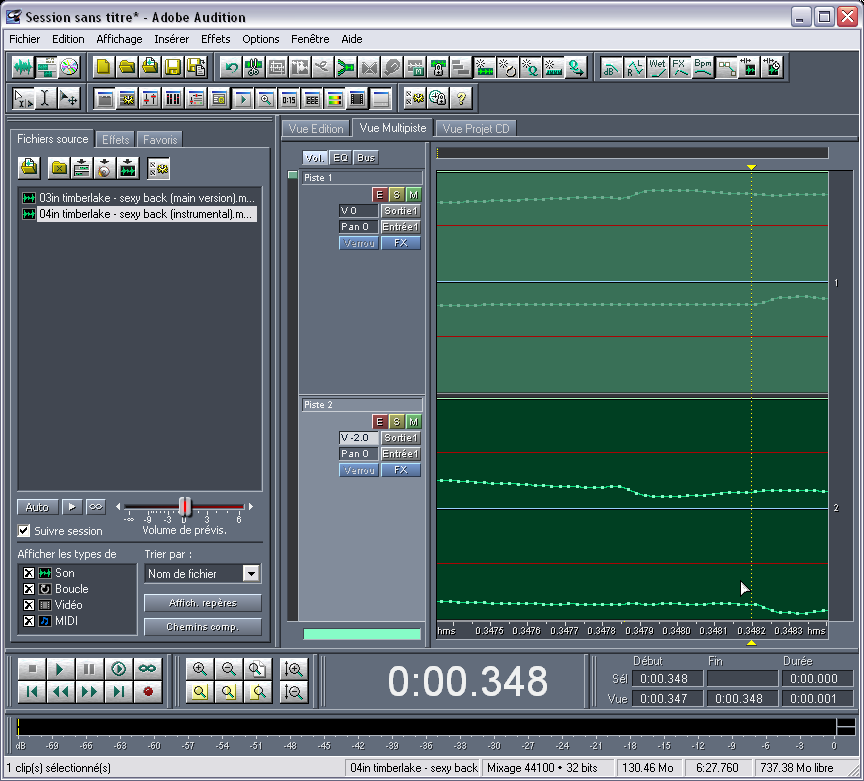
So, we’re trying to synchronize the track and its instrumental so that the waveforms can "see" each other just like in a mirror. You check if the alignment is preserved all along the track, which is normally the case in most hip hop songs, RnB or teen pop (the opposite would mean that the source is a vinyl record, or that it’s been recorded in studio on tapes). If it doesn’t remain aligned, you can hear as a phasing effect and the song going back from acapella to normal.

After that, you export the session mix into a file, that you open back again to apply some noise reduction (see my other tutorials for detailed parameters to apply), step that should be useless if both sources are clean and perfectly synced.
You select the part that doesn’t contain vocals off the obtained acapella; this part must already sound like a very altered muffled and noisy rhythm.

Capture this selection to define it as the noise in the noise reduction windows, in order to apply the noise reduction over the rest of the acapella (this step and the following are described more precisely on another tutorial).
Normalize the sound or play with the dynamics if that’s needed then push the key F11 (Convert Sample Type).

You convert the acapella into 16 bits to gain some space, and even maybe in mono if the vocals are exclusively in the center of the mix, but that’s not the case here.
Save. Exit Audition.
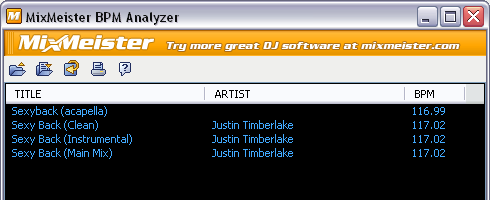
Drag ‘n’ drop the acapella and the original track into MixMeister BPM Analyzer so you can already have an idea of the tempo of the track.

Open Acid, drag ‘n’ drop the original tune, so you can treat it into the Beat mapper.

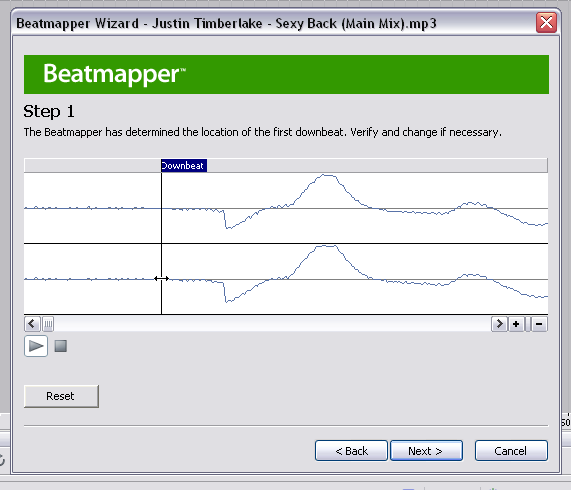
Define the downbeat on the beginning of a measure, be precise, pick it somewhere where it’s neat.

In the following steps of the BeatMapper, try to approach the tempo you found with MixMeister (although the number given by MM BPM Analyzer mustn’t be considered as an 11th commandment) checking quick if every measure is OK and being precise for the ending measures. Anyway, there are better tutorials for that purpose and I consider the Beatmapper is intuitive enough so I don’t have to develop on that point.
In the Clip Properties of the track in Acid, you can see 2 numbers, tempo & offset, which are the parameters that resulted from the beatmapping process…

…and these parameters can apply to the acapella so you don’t have to do that step again. You’ll juste have to get the right numbers in the right place.

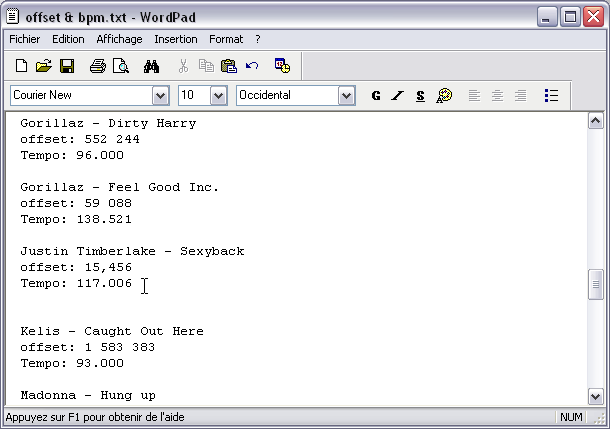
Plus, if you’re like me and you don’t want to beat map acapellas more than once, put these offset/tempo data into a small text file which will be a very useful small database.

After this rather simple tutorial, I may try to explain some tips for Acid or Ableton Live, a bit like I presented some steps here.
AdSense 336x280December 27, 2006 at 3:54 pm #608124
totomParticipantHere’s a tutorial to show you how I perform any subtraction between an original song and its instrumental so I can get its acapella, and maybe acapella to get the instrumental (which is a bit harder). All that using Audition.
I’m also going to give a tip that will make beat mapping for acapellas simple — with a few steps required during the subtraction process in Audition — so you don’ have to beat map the acapella each time you want to use it or test it over one track.First, you’d rather take sources which are as clean as possible, the promo CD of a single or at least a CD rip if you can’t get the plastic object. To make an analog subtraction using two vinyls of a single, I suppose you have to be very precise and I’m not a specialist so I’ll let anyone else who knows better explain that. In that example, I first used a vinyl version of the single before getting a version coming from the promo CD (that’s why there are differences in the filenames at some point).
You can perform the subtraction like an ugly duckling — me in this example — using MP3 but in this case you’ll probably have to clean the result a bit, like I will explain during one step. Anyway, let’s begin:
Open the song you want to get the acapella from and its instrumental version in Audition. Go into Multi track mode and place them on 2 different tracks.
For the following steps, click on the "Hybrid" mode (red square in the pic above).
Double click on the instrumental to edit it and invert it vertically (the full track of course).
If the song and its instrumental are not the exact same volume, "Display the statistics" for 2 identical parts of the song (take the introduction before the vocals arrive).
Look at different RMS levels:
Here, we’ve got something close to 2 dB, so you just tweak the instrumental track level down by 2 dB (later we’ll be able to tweak it more precisely, following what we hear).
As we’re going to beat map the original track in order to get "beat mapping coordinates", we stick the original track right in the beginning of the multi track…
…then we cut enough off the beginning of the instrumental (left click on the limits) if that’s needed (negative offset).
Then we zoom on one of the first neat percussions (choose preferably a snare drum, which is more distorted (a.k.a. more into high frequencies) so it’s also easier to synchronize visually.
So, we’re trying to synchronize the track and its instrumental so that the waveforms can "see" each other just like in a mirror. You check if the alignment is preserved all along the track, which is normally the case in most hip hop songs, RnB or teen pop (the opposite would mean that the source is a vinyl record, or that it’s been recorded in studio on tapes). If it doesn’t remain aligned, you can hear as a phasing effect and the song going back from acapella to normal.
After that, you export the session mix into a file, that you open back again to apply some noise reduction (see my other tutorials for detailed parameters to apply), step that should be useless if both sources are clean and perfectly synced.
You select the part that doesn’t contain vocals off the obtained acapella; this part must already sound like a very altered muffled and noisy rhythm.
Capture this selection to define it as the noise in the noise reduction windows, in order to apply the noise reduction over the rest of the acapella (this step and the following are described more precisely on another tutorial).
Normalize the sound or play with the dynamics if that’s needed then push the key F11 (Convert Sample Type).
You convert the acapella into 16 bits to gain some space, and even maybe in mono if the vocals are exclusively in the center of the mix, but that’s not the case here.
Save. Exit Audition.
Drag ‘n’ drop the acapella and the original track into MixMeister BPM Analyzer so you can already have an idea of the tempo of the track.
Open Acid, drag ‘n’ drop the original tune, so you can treat it into the Beat mapper.
Define the downbeat on the beginning of a measure, be precise, pick it somewhere where it’s neat.
In the following steps of the BeatMapper, try to approach the tempo you found with MixMeister (although the number given by MM BPM Analyzer mustn’t be considered as an 11th commandment) checking quick if every measure is OK and being precise for the ending measures. Anyway, there are better tutorials for that purpose and I consider the Beatmapper is intuitive enough so I don’t have to develop on that point.
In the Clip Properties of the track in Acid, you can see 2 numbers, tempo & offset, which are the parameters that resulted from the beatmapping process…
…and these parameters can apply to the acapella so you don’t have to do that step again. You’ll juste have to get the right numbers in the right place.
Plus, if you’re like me and you don’t want to beat map acapellas more than once, put these offset/tempo data into a small text file which will be a very useful small database.
After this rather simple tutorial, I may try to explain some tips for Acid or Ableton Live, a bit like I presented some steps here.
AdSense 336x280March 3, 2007 at 1:48 am #614765
tunezParticipanthow about with protools
AdSense 336x280April 10, 2007 at 9:48 am #618253
DJ ValParticipanttotom thank you so much for this great tutorial. I’ve just recently re-installed Audition so this tutorial will be quite handy. Now I’ve just got to go and re-install the other programes that you have used

Many thanks
ValAdSense 336x280May 4, 2007 at 3:26 pm #620634
y2nealParticipantthankssssssssssssssssss
AdSense 336x280June 5, 2007 at 4:56 pm #624123
silvestreParticipantwhoa! this is handy! – bookmarked
 AdSense 336x280March 15, 2009 at 11:33 pm #665493
NickMcParticipantdamn! I need to start using this program
AdSense 336x280April 8, 2009 at 7:10 pm #666419
rlk8481Participant[size size=200:2okhwt3g]Nice post bro…..Check out my tracks at http://www.myspace.com/mindstatebeats[/size:2okhwt3g]
AdSense 336x280April 24, 2009 at 11:25 am #666847
foxerParticipantAudition
AdSense 336x280May 24, 2010 at 12:37 pm #679715
Banny83Participantvery nice
AdSense 336x280May 28, 2010 at 1:32 am #679805
mwolsfeldParticipantTechniques like this are why I switched to Audition.
AdSense 336x280January 6, 2014 at 5:27 pm #701567
mic_cimParticipantthanks for sharing
AdSense 336x280January 13, 2014 at 5:54 pm #701641November 15, 2014 at 1:18 pm #703635
acapellaKeymasterQuick update to let everyone know that the images in this amazing tutorial from Totom have now all been successfully recovered – phew
AdSense 336x280May 4, 2016 at 12:45 pm #705296
totomParticipantHere’s another tutorial with fixed links for pictures:
Here’s a tutorial to show you how I perform any subtraction between an original song and its instrumental so I can get its acapella, and maybe acapella to get the instrumental (which is a bit harder). All that using Audition.
I’m also going to give a tip that will make beat mapping for acapellas simple — with a few steps required during the subtraction process in Audition — so you don’ have to beat map the acapella each time you want to use it or test it over one track.First, you’d rather take sources which are as clean as possible, the promo CD of a single or at least a CD rip if you can’t get the plastic object. To make an analog subtraction using two vinyls of a single, I suppose you have to be very precise and I’m not a specialist so I’ll let anyone else who knows better explain that. In that example, I first used a vinyl version of the single before getting a version coming from the promo CD (that’s why there are differences in the filenames at some point).
You can perform the subtraction like an ugly duckling — me in this example — using MP3 but in this case you’ll probably have to clean the result a bit, like I will explain during one step. Anyway, let’s begin:
Open the song you want to get the acapella from and its instrumental version in Audition. Go into Multi track mode and place them on 2 different tracks.
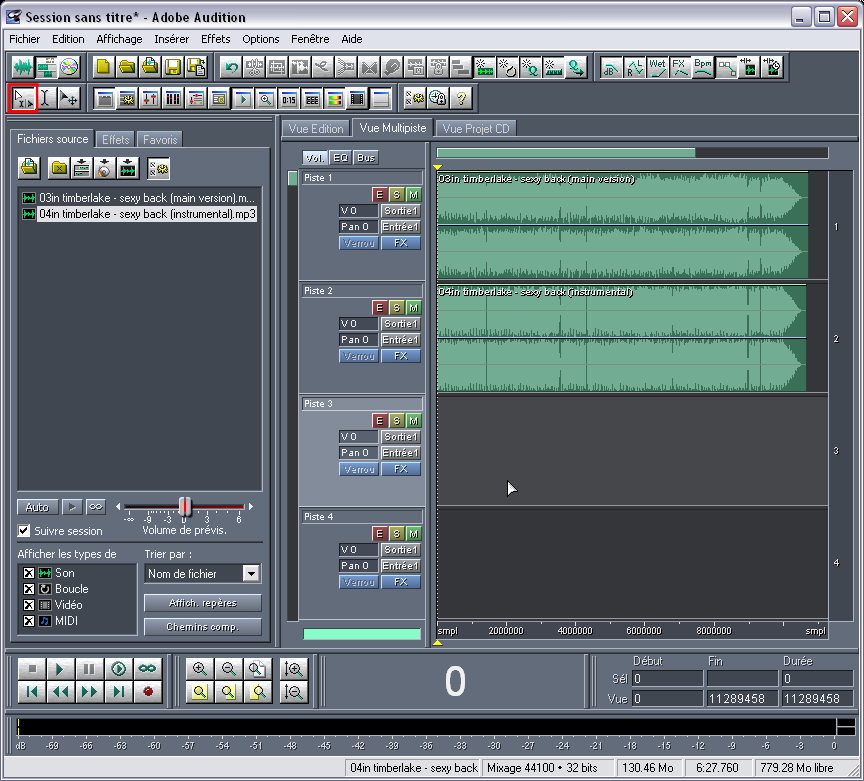
For the following steps, click on the "Hybrid" mode (red square in the pic above).
Double click on the instrumental to edit it and invert it vertically (the full track of course).
If the song and its instrumental are not the exact same volume, "Display the statistics" for 2 identical parts of the song (take the introduction before the vocals arrive).
Look at different RMS levels:
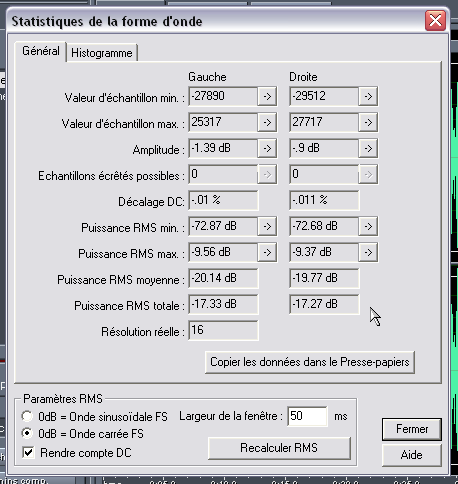
Here, we’ve got something close to 2 dB, so you just tweak the instrumental track level down by 2 dB (later we’ll be able to tweak it more precisely, following what we hear).
As we’re going to beat map the original track in order to get "beat mapping coordinates", we stick the original track right in the beginning of the multi track…
…then we cut enough off the beginning of the instrumental (left click on the limits) if that’s needed (negative offset).
Then we zoom on one of the first neat percussions (choose preferably a snare drum, which is more distorted (a.k.a. more into high frequencies) so it’s also easier to synchronize visually.
So, we’re trying to synchronize the track and its instrumental so that the waveforms can "see" each other just like in a mirror. You check if the alignment is preserved all along the track, which is normally the case in most hip hop songs, RnB or teen pop (the opposite would mean that the source is a vinyl record, or that it’s been recorded in studio on tapes). If it doesn’t remain aligned, you can hear as a phasing effect and the song going back from acapella to normal.
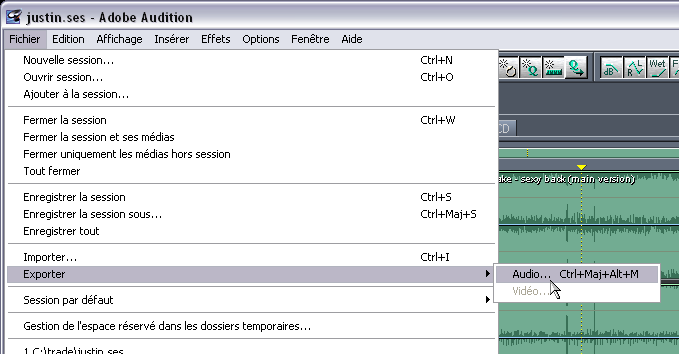
After that, you export the session mix into a file, that you open back again to apply some noise reduction (see my other tutorials for detailed parameters to apply), step that should be useless if both sources are clean and perfectly synced.
You select the part that doesn’t contain vocals off the obtained acapella; this part must already sound like a very altered muffled and noisy rhythm.
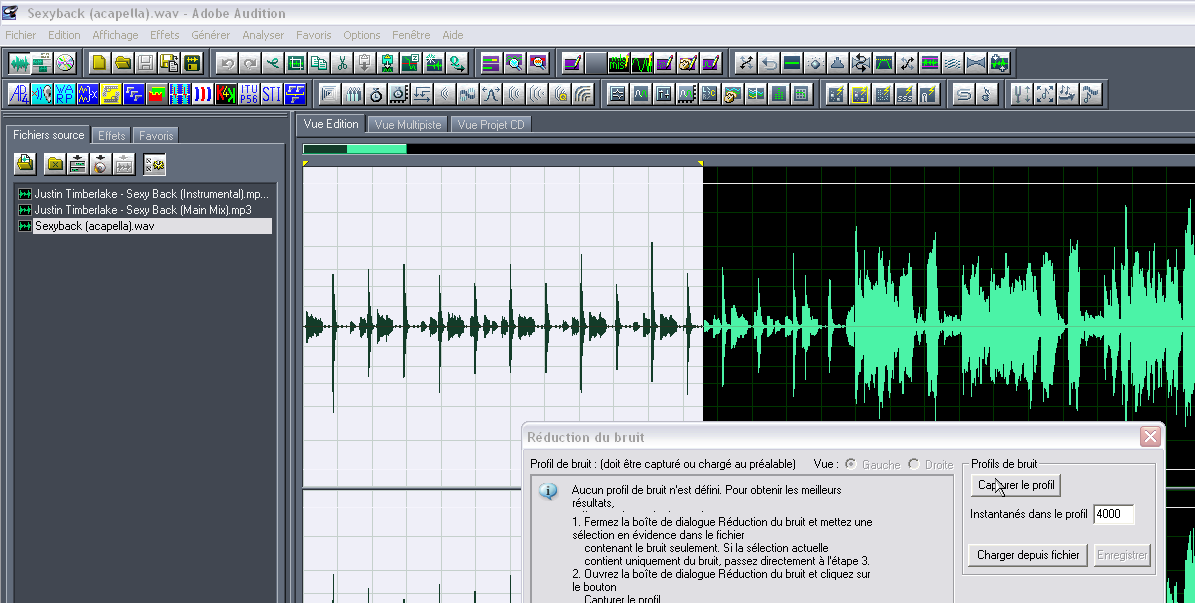
Capture this selection to define it as the noise in the noise reduction windows, in order to apply the noise reduction over the rest of the acapella (this step and the following are described more precisely on another tutorial).
Normalize the sound or play with the dynamics if that’s needed then push the key F11 (Convert Sample Type).
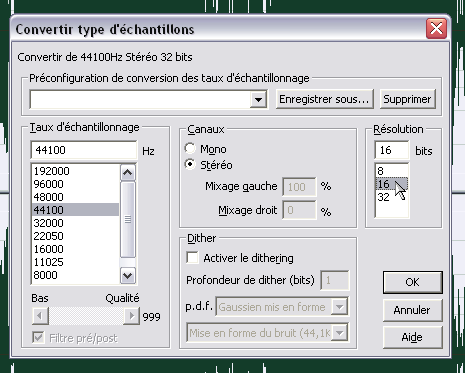
You convert the acapella into 16 bits to gain some space, and even maybe in mono if the vocals are exclusively in the center of the mix, but that’s not the case here.
Save. Exit Audition.
Drag ‘n’ drop the acapella and the original track into MixMeister BPM Analyzer so you can already have an idea of the tempo of the track.
Open Acid, drag ‘n’ drop the original tune, so you can treat it into the Beat mapper.
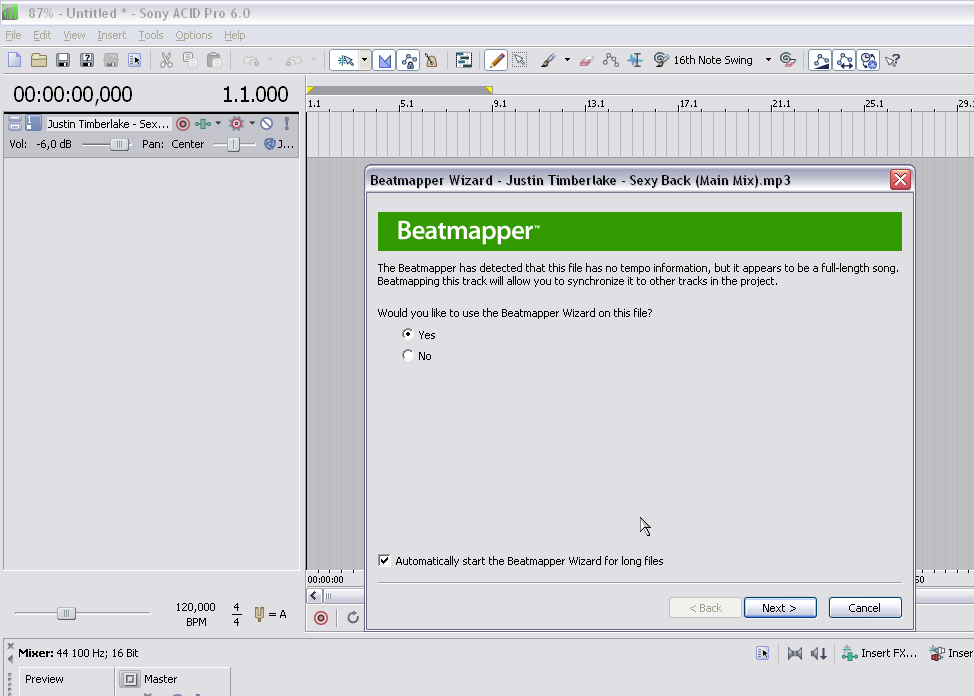
Define the downbeat on the beginning of a measure, be precise, pick it somewhere where it’s neat.
In the following steps of the BeatMapper, try to approach the tempo you found with MixMeister (although the number given by MM BPM Analyzer mustn’t be considered as an 11th commandment) checking quick if every measure is OK and being precise for the ending measures. Anyway, there are better tutorials for that purpose and I consider the Beatmapper is intuitive enough so I don’t have to develop on that point.
In the Clip Properties of the track in Acid, you can see 2 numbers, tempo & offset, which are the parameters that resulted from the beatmapping process…
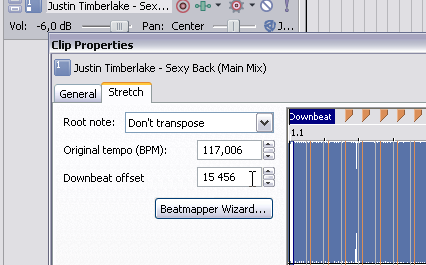
…and these parameters can apply to the acapella so you don’t have to do that step again. You’ll juste have to get the right numbers in the right place.
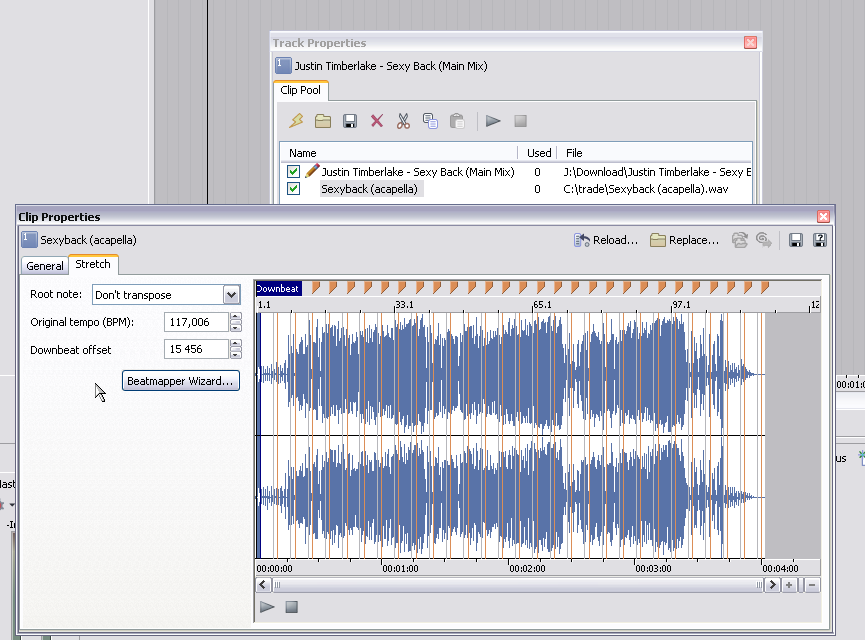
Plus, if you’re like me and you don’t want to beat map acapellas more than once, put these offset/tempo data into a small text file which will be a very useful small database.
After this rather simple tutorial, I may try to explain some tips for Acid or Ableton Live, a bit like I presented some steps here.
AdSense 336x280 -
AuthorPosts
The forum ‘Tutorials’ is closed to new topics and replies.