
Front Page › Forums › AUDIO & TECHZONE › Tutorials › [STEP BY STEP] Using Ableton Live to create a constant tempo
-
AuthorPosts
-
June 30, 2006 at 2:33 pm #534448
totomParticipantAfter exploiting 5.1 audio sources (for multichannel SaCD, it’s simple, you just need a hardware SaCD decoder and record each analog output or the ones you interested in), we’re going to see howto make constant, in a quite easy way, the tempo of a regular song in which tempo varies (we’re talking about anything that’s basically not hip hop or electronic music) using Ableton Live.
I’d like to thank comar and payroll for telling me this technique.
From the point of view where we’re having a lot of fun with acapella extractions from Ziggy Stardust’s 5.1 mix, I’ll do a brief part where I’m gonna explain how to proceed to fix the tempo of any acapella.
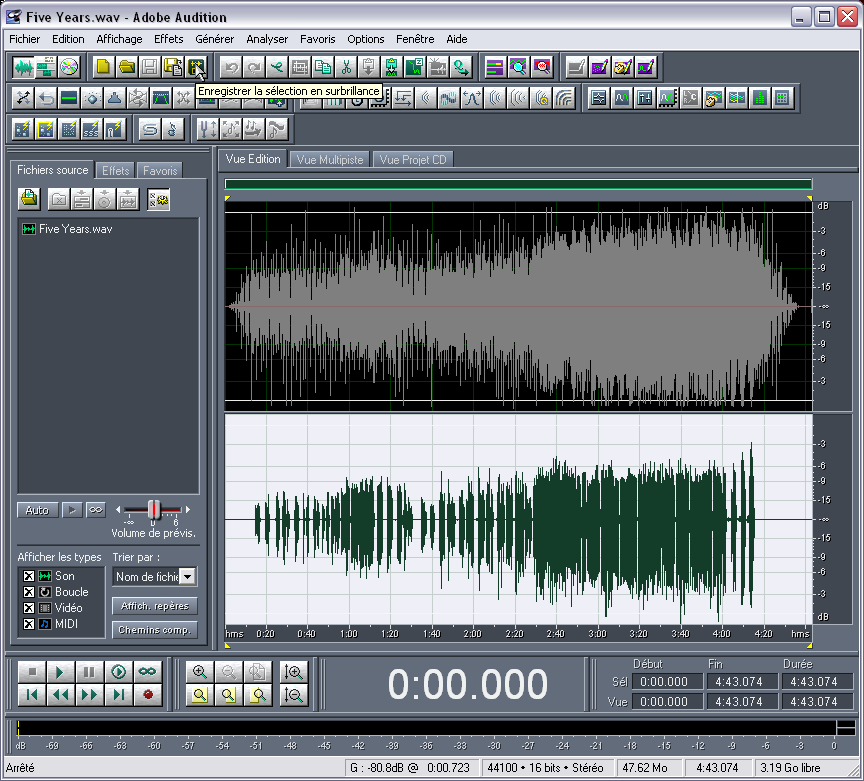
To do that, we’re gonna use channel 3 (containing the vocals in general) and one of the first 2 channels on which we’re gonna apply the following steps in Audition, so that we get the original track on one side and the acapella on the other. We need to open channel 1 or 2 and convert it in stereo, just like this:
If it’s already in stereo, select right channel et push "Suppr" key (same as a Mute or Silence function).
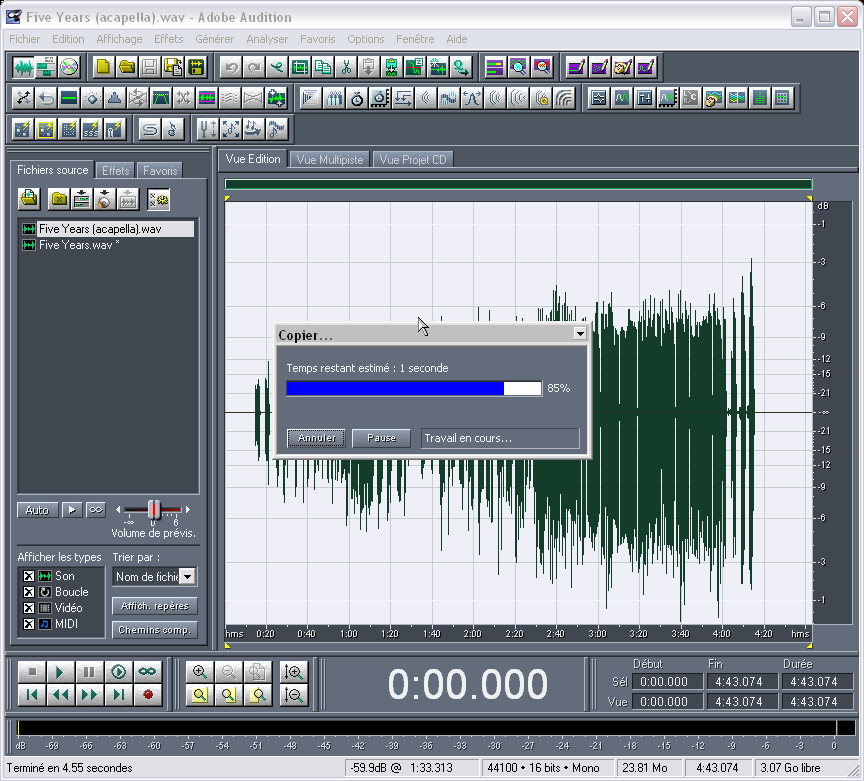
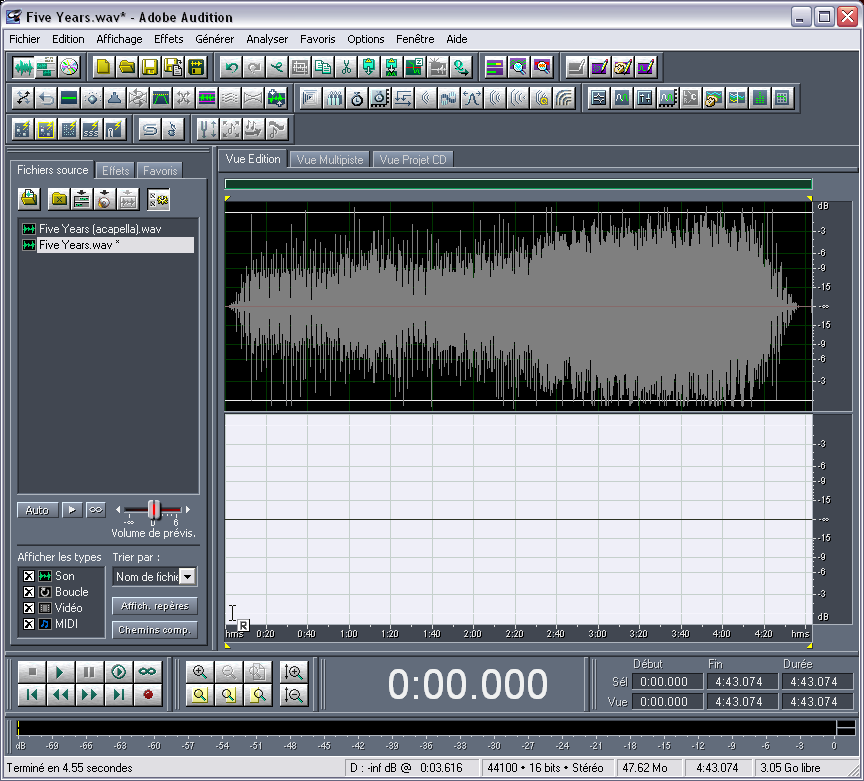
Then, open the acapella, select all the content and copy it.

On the other file, select the empty channel (the right in our case).

Then, paste the acpella in it.

Save. Quite simple, isn’t it?
———————————————-
The following part applies to any song in which tempo varies slightly (you’d better have clear marks of rhythms into the song).
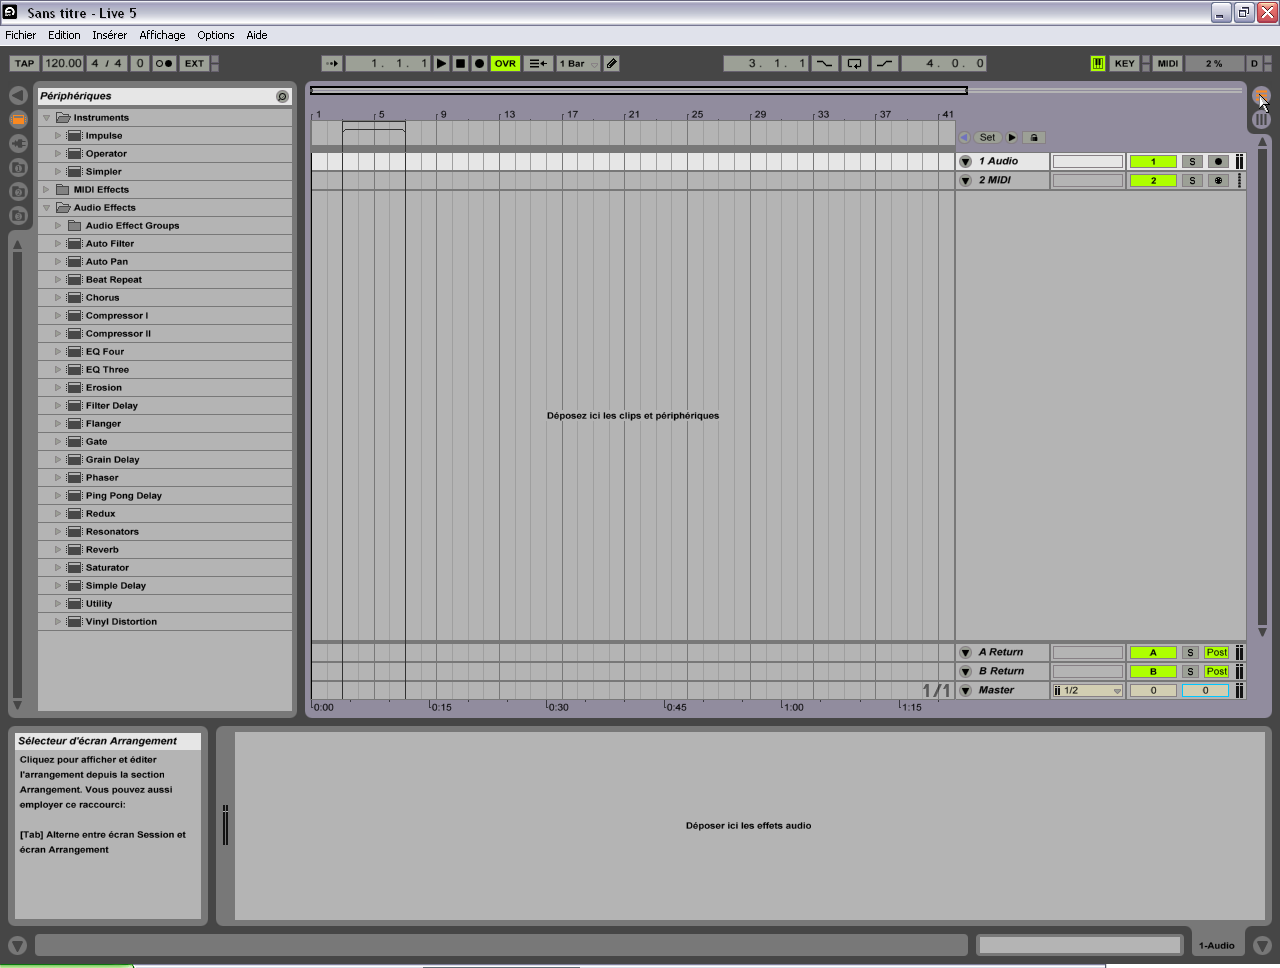
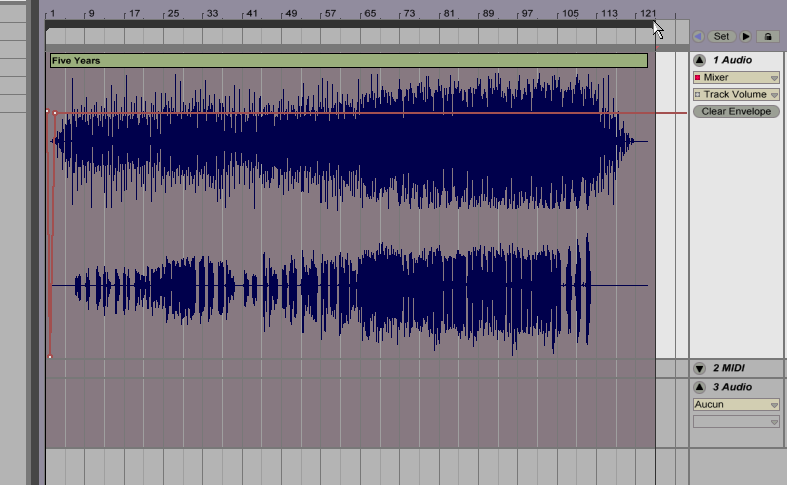
Open Ableton Live, get into Arrangement Mode (or whatever it’s called, just look at the pictures to find out)

Drag and drop the file which we want to set the tempo straight into an Audio channel, let Live analyse it (for more clarity, I applied the treatment on left channel only — in fact, I made the previous steps in Audition after I set the tempo in Live).

In the lower part, zoom into the track’s beginning, before the vocals begin obviously.

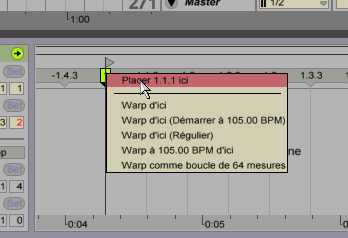
Put the number 1 mark on a clear mark of rhythm (try to choose the beginning of a measure), by clicking right > Set 1.1.1 Here. Double click in the grey ruler to create that mark in case it’s not here.

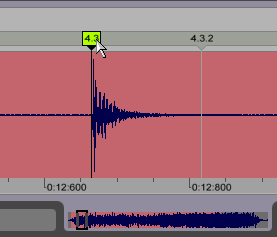
In general, Live detects approximatively the song’s tempo. From this point, you just have to correct the tempo fluctuations telling on which time is that kick or that snare drum. Do that on a time that’s quite shifted from where it should be:

Double-click on a time that looks shifted, here 4.3, and move it on the exact time (beware to the drummer’s playing, pick a drum shot that seems as well placed as possible). You can move it even more precisely using the zoom.

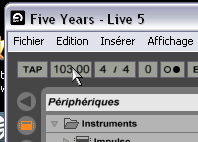
Adjust the working tempo, so that it will be close enough to original approximate tempo.

If you notice at one moment every marks are shifting progressively and you don’t want to move every time over few measures, you can select the time from where the shift is happening.

Then, you define the tempo from this time.
Click right > Warp from here (you can choose between few options).
Do this ’til the end if possible, until you can at least. Move each time that seems important to you, it’s useless to do it for each measure but it’s also useless to do it too largely.
When you’re finished, you should get a forest of rhythm marks.
Into the arranger, stick the song to the measure marks, select a bit wider part than the song itself (see last image) and click on File > Convert to hard drive…

In the exportation window, select the right options (the analyse file is not mandatory and unclick Convert into mono if your source is stereophonic).
Click OK. Your file is at the tempo you’ve chosen (by the way I advise you to set right now the tempo you’re gonna work with the file).In fact, in my example, I made it backwards, and did the first steps in Audition after I set the song into the right tempo, then re-opened the exported file from Audition so that Ableton Live sets it to the right tempo. It’s just a different way to do, a bit more complicated.

On this picture, you see well the zone that’ll be exported so you don’t find yourself with a cut or too long file.
Before I discovered this technique, I used to cut a song into pieces using Audition so I could import them into Acid, but this particular technique has the advantage of preserving the unity of the song and not to have to carry a dozen of different loop files (even if the latest Acid version deals well with it).
———————————————–
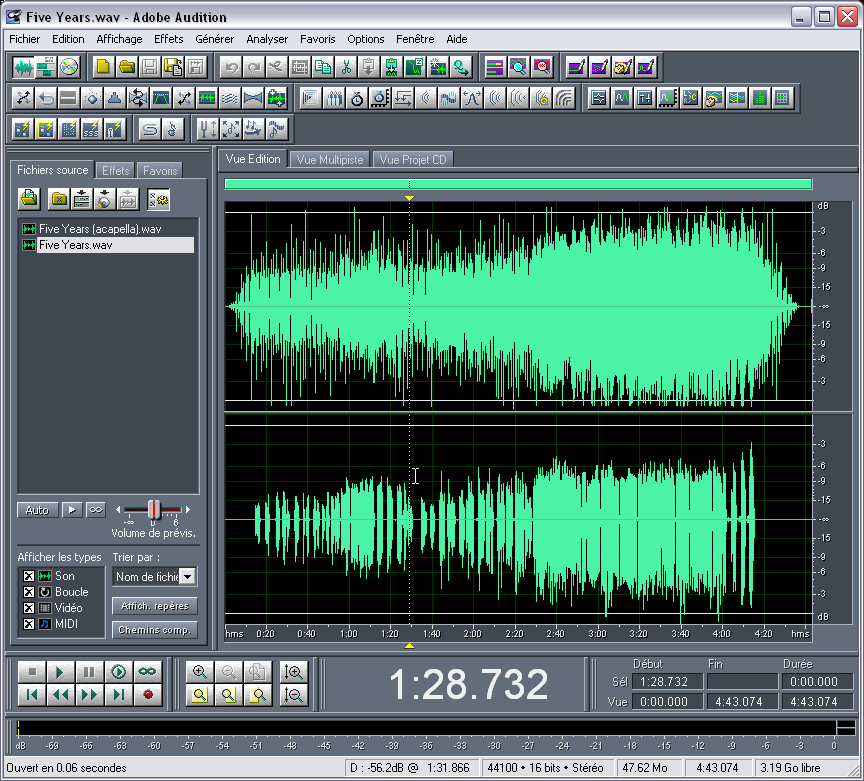
Let’s go back into Audition, and open the obtained stereo file with constant chosen tempo.

Select the channnel containing the acapella then "Save the selection as" (in our case "Five Years (acapella)").
Now we’re done, he’re an acapella with the right tempo, all ready to be mashed, cut and mixed up.AdSense 336x280June 30, 2006 at 2:33 pm #592430
totomParticipantAfter exploiting 5.1 audio sources (for multichannel SaCD, it’s simple, you just need a hardware SaCD decoder and record each analog output or the ones you interested in), we’re going to see howto make constant, in a quite easy way, the tempo of a regular song in which tempo varies (we’re talking about anything that’s basically not hip hop or electronic music) using Ableton Live.
I’d like to thank comar and payroll for telling me this technique.
From the point of view where we’re having a lot of fun with acapella extractions from Ziggy Stardust’s 5.1 mix, I’ll do a brief part where I’m gonna explain how to proceed to fix the tempo of any acapella.
To do that, we’re gonna use channel 3 (containing the vocals in general) and one of the first 2 channels on which we’re gonna apply the following steps in Audition, so that we get the original track on one side and the acapella on the other. We need to open channel 1 or 2 and convert it in stereo, just like this:If it’s already in stereo, select right channel et push "Suppr" key (same as a Mute or Silence function).
Then, open the acapella, select all the content and copy it.
On the other file, select the empty channel (the right in our case).
Then, paste the acpella in it.
Save. Quite simple, isn’t it?
———————————————-
The following part applies to any song in which tempo varies slightly (you’d better have clear marks of rhythms into the song).
Open Ableton Live, get into Arrangement Mode (or whatever it’s called, just look at the pictures to find out)
Drag and drop the file which we want to set the tempo straight into an Audio channel, let Live analyse it (for more clarity, I applied the treatment on left channel only — in fact, I made the previous steps in Audition after I set the tempo in Live).
In the lower part, zoom into the track’s beginning, before the vocals begin obviously.
Put the number 1 mark on a clear mark of rhythm (try to choose the beginning of a measure), by clicking right > Set 1.1.1 Here. Double click in the grey ruler to create that mark in case it’s not here.
In general, Live detects approximatively the song’s tempo. From this point, you just have to correct the tempo fluctuations telling on which time is that kick or that snare drum. Do that on a time that’s quite shifted from where it should be:
Double-click on a time that looks shifted, here 4.3, and move it on the exact time (beware to the drummer’s playing, pick a drum shot that seems as well placed as possible). You can move it even more precisely using the zoom.
Adjust the working tempo, so that it will be close enough to original approximate tempo.
If you notice at one moment every marks are shifting progressively and you don’t want to move every time over few measures, you can select the time from where the shift is happening.
Then, you define the tempo from this time.
Click right > Warp from here (you can choose between few options).Do this ’til the end if possible, until you can at least. Move each time that seems important to you, it’s useless to do it for each measure but it’s also useless to do it too largely.
When you’re finished, you should get a forest of rhythm marks.Into the arranger, stick the song to the measure marks, select a bit wider part than the song itself (see last image) and click on File > Convert to hard drive…
In the exportation window, select the right options (the analyse file is not mandatory and unclick Convert into mono if your source is stereophonic).
Click OK. Your file is at the tempo you’ve chosen (by the way I advise you to set right now the tempo you’re gonna work with the file).In fact, in my example, I made it backwards, and did the first steps in Audition after I set the song into the right tempo, then re-opened the exported file from Audition so that Ableton Live sets it to the right tempo. It’s just a different way to do, a bit more complicated.
On this picture, you see well the zone that’ll be exported so you don’t find yourself with a cut or too long file.
Before I discovered this technique, I used to cut a song into pieces using Audition so I could import them into Acid, but this particular technique has the advantage of preserving the unity of the song and not to have to carry a dozen of different loop files (even if the latest Acid version deals well with it).
———————————————–
Let’s go back into Audition, and open the obtained stereo file with constant chosen tempo.
Select the channnel containing the acapella then "Save the selection as" (in our case "Five Years (acapella)").
Now we’re done, he’re an acapella with the right tempo, all ready to be mashed, cut and mixed up.AdSense 336x280July 6, 2006 at 10:09 pm #592723
dramaproductionsParticipantGreat tutorial – seems like a great solution to a very common problem!
Can’t wait to try it!!!
AdSense 336x280August 11, 2006 at 10:41 am #595840
djeswiftParticipantGreat tutorial man, I have Live and could use some more tutorials so I can get the most out of it. I’ll be hitting you up with some help questions soon I’m sure;)
AdSense 336x280August 11, 2006 at 1:10 pm #595845
acapellaKeymasterdjeswift wrote:Great tutorial man, I have Live and could use some more tutorials so I can get the most out of it. I’ll be hitting you up with some help questions soon I’m sure;)tomtom’s one of our very own Tutorial writers eswift & I also love Ableton Live so feel free to pump me a question via AIM.
AdSense 336x280January 6, 2007 at 2:00 pm #609075
alainpolisParticipantVery Good Tutorial.. Tnx for the post
AdSense 336x280January 18, 2007 at 10:01 am #610451
acheadKeymasterthanx i’ll give this a try too
 AdSense 336x280April 9, 2007 at 2:22 pm #618151
fastenParticipantThank you very much guy for this tutorial!! :cheesy:
AdSense 336x280May 22, 2007 at 10:42 pm #622457
Tlew41Participantthat helps alot! thanks!
AdSense 336x280June 17, 2007 at 3:17 am #625642
BekayParticipantinteresting – I might give this a try right now
AdSense 336x280August 13, 2007 at 11:47 am #631308
JuggernautParticipant[quote-"djnando"]thnx[/quote]
Please do NOT post one word replies or start new topics that have no constructive sense to them whatsoever.You will receive an official warning next time.
AdSense 336x280November 15, 2007 at 4:03 am #637159
mofdonkParticipantvery useful info here thanks alot
AdSense 336x280December 24, 2008 at 8:32 pm #661293
p.illaParticipantI just started using Ableton, I find it pretty hard but yeh I have to sit down and read your post and try it, cuz I need this for doing remixes. Thanks.
AdSense 336x280January 17, 2009 at 1:51 pm #662747
sushi1Participantsorry i’m new here i though it was the right place to ask a question about ableton live 7.
i just bought it after trying the Trial version because i’m very much into mashup songs, so Ableton sound like perfect for this kind of thing. I was trying to mashup Naughty by Nature’s hip hop hooray with the intro of The GZA’s Knock Knock it sounded kind of crapy but there was some idea behind it. So i most tutorials to see if there was anything that could help me, but i didn’t found anything. someone can help me with this stuff ? thx.AdSense 336x280January 17, 2009 at 6:25 pm #662763
Reggie_p75ParticipantIm an Acid user (the software NOT the chemical
) and also use SoundForge.I’ve used 2 techniques:- Old Skool n Nu Skool
Old Skool :-
You chop up ur track into 1 bar/2bar/4 bar loops n sequence them back together, totally avoiding the dodgy timing that 70s funky drummers had or the warp of vinyl (or some other crap that nessitates loop making). Gets good results tho time consuming. Timing is tighter when compared to playback of both the original n the ‘re-grooved’ version… to test, play a 4/4 beat centre panned, the old track left n the ‘re-grooved’ track right.. see the difference… NO sorry, hear the difference!!!!
Nu Skool:-
Use the similar function in ur software (Acid/Ableton) and ‘re-groove’ the track to fit timing. Gets similarly good results but is ALSO very time consuming.. can be confusing for a newcomer who doesnt understand musical timing n stuff, yet should have some understanding timing.
I do both… sometimes with a track that has heavy drum rolls or percussive rolls i chop my loops 2 beats in then 4 beats after that. then ur hitting the mid point of a 4 bar loop n usually dont have to contend with drum rolls and the like.
I have used the new-fangled software ‘re-groove’ function but still enjoy the laborious loop cutting, knowing that its as tight as hell.. no lazy beats for me
AdSense 336x280January 18, 2009 at 12:59 pm #662792
sushi1Participant[quote quote="Reggie_p75"]Im an Acid user (the software NOT the chemical 😀 ) and also use SoundForge.
I’ve used 2 techniques:- Old Skool n Nu Skool
Old Skool :-
You chop up ur track into 1 bar/2bar/4 bar loops n sequence them back together, totally avoiding the dodgy timing that 70s funky drummers had or the warp of vinyl (or some other crap that nessitates loop making). Gets good results tho time consuming. Timing is tighter when compared to playback of both the original n the ‘re-grooved’ version… to test, play a 4/4 beat centre panned, the old track left n the ‘re-grooved’ track right.. see the difference… NO sorry, hear the difference!!!!
Nu Skool:-
Use the similar function in ur software (Acid/Ableton) and ‘re-groove’ the track to fit timing. Gets similarly good results but is ALSO very time consuming.. can be confusing for a newcomer who doesnt understand musical timing n stuff, yet should have some understanding timing.
I do both… sometimes with a track that has heavy drum rolls or percussive rolls i chop my loops 2 beats in then 4 beats after that. then ur hitting the mid point of a 4 bar loop n usually dont have to contend with drum rolls and the like.
I have used the new-fangled software ‘re-groove’ function but still enjoy the laborious loop cutting, knowing that its as tight as hell.. no lazy beats for me[/quote]
strugling to understand, but i think the problem come mainly from the fact that GZA’s Knock Knock seems to be like a 3/4th because of the variation and the beat is still a 4/4th sounds wierd to me like that but if you hear the song, you may understand.
AdSense 336x280January 19, 2009 at 1:56 pm #662827
Reggie_p75Participant[quote quote="sushi1":39fi09w6][quote quote="Reggie_p75":39fi09w6]Im an Acid user (the software NOT the chemical
) and also use SoundForge.I’ve used 2 techniques:- Old Skool n Nu Skool
Old Skool :-
You chop up ur track into 1 bar/2bar/4 bar loops n sequence them back together, totally avoiding the dodgy timing that 70s funky drummers had or the warp of vinyl (or some other crap that nessitates loop making). Gets good results tho time consuming. Timing is tighter when compared to playback of both the original n the ‘re-grooved’ version… to test, play a 4/4 beat centre panned, the old track left n the ‘re-grooved’ track right.. see the difference… NO sorry, hear the difference!!!!
Nu Skool:-
Use the similar function in ur software (Acid/Ableton) and ‘re-groove’ the track to fit timing. Gets similarly good results but is ALSO very time consuming.. can be confusing for a newcomer who doesnt understand musical timing n stuff, yet should have some understanding timing.
I do both… sometimes with a track that has heavy drum rolls or percussive rolls i chop my loops 2 beats in then 4 beats after that. then ur hitting the mid point of a 4 bar loop n usually dont have to contend with drum rolls and the like.
I have used the new-fangled software ‘re-groove’ function but still enjoy the laborious loop cutting, knowing that its as tight as hell.. no lazy beats for me[/quote:39fi09w6]
strugling to understand, but i think the problem come mainly from the fact that GZA’s Knock Knock seems to be like a 3/4th because of the variation and the beat is still a 4/4th sounds wierd to me like that but if you hear the song, you may understand.[/quote:39fi09w6]
Apologies.. forgot to mention my loop cutting was referring to general pop/dance material where the beat is 4/4. I guess a 3/4 loop would be difficult to cut unless u had reference points relevant to 3/4 timing.. No doubt there is an option deep down in the depths of modern software to help..
Anyone help with that??
AdSense 336x280June 11, 2010 at 3:39 am #680171
Omega192ParticipantIt’s great to see such a large amount of Ableton Live tutorials, thank you! :]
AdSense 336x280January 6, 2014 at 5:21 pm #701564
mic_cimParticipantthanks
AdSense 336x280November 15, 2014 at 1:26 pm #703640
acapellaKeymasterAll images restored inside this Tutorial from Totom
AdSense 336x280May 4, 2016 at 12:36 pm #705293
totomParticipantThere, I fixed the links again:
After exploiting 5.1 audio sources (for multichannel SaCD, it’s simple, you just need a hardware SaCD decoder and record each analog output or the ones you interested in), we’re going to see howto make constant, in a quite easy way, the tempo of a regular song in which tempo varies (we’re talking about anything that’s basically not hip hop or electronic music) using Ableton Live.
I’d like to thank comar and payroll for telling me this technique.
From the point of view where we’re having a lot of fun with acapella extractions from Ziggy Stardust’s 5.1 mix, I’ll do a brief part where I’m gonna explain how to proceed to fix the tempo of any acapella.
To do that, we’re gonna use channel 3 (containing the vocals in general) and one of the first 2 channels on which we’re gonna apply the following steps in Audition, so that we get the original track on one side and the acapella on the other. We need to open channel 1 or 2 and convert it in stereo, just like this: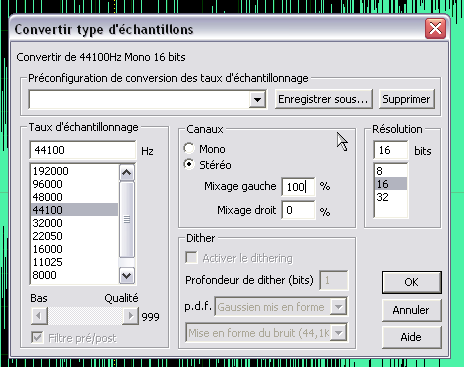
If it’s already in stereo, select right channel et push "Suppr" key (same as a Mute or Silence function).
Then, open the acapella, select all the content and copy it.
On the other file, select the empty channel (the right in our case).
Then, paste the acpella in it.
Save. Quite simple, isn’t it?
———————————————-
The following part applies to any song in which tempo varies slightly (you’d better have clear marks of rhythms into the song).
Open Ableton Live, get into Arrangement Mode (or whatever it’s called, just look at the pictures to find out)
Drag and drop the file which we want to set the tempo straight into an Audio channel, let Live analyse it (for more clarity, I applied the treatment on left channel only — in fact, I made the previous steps in Audition after I set the tempo in Live).
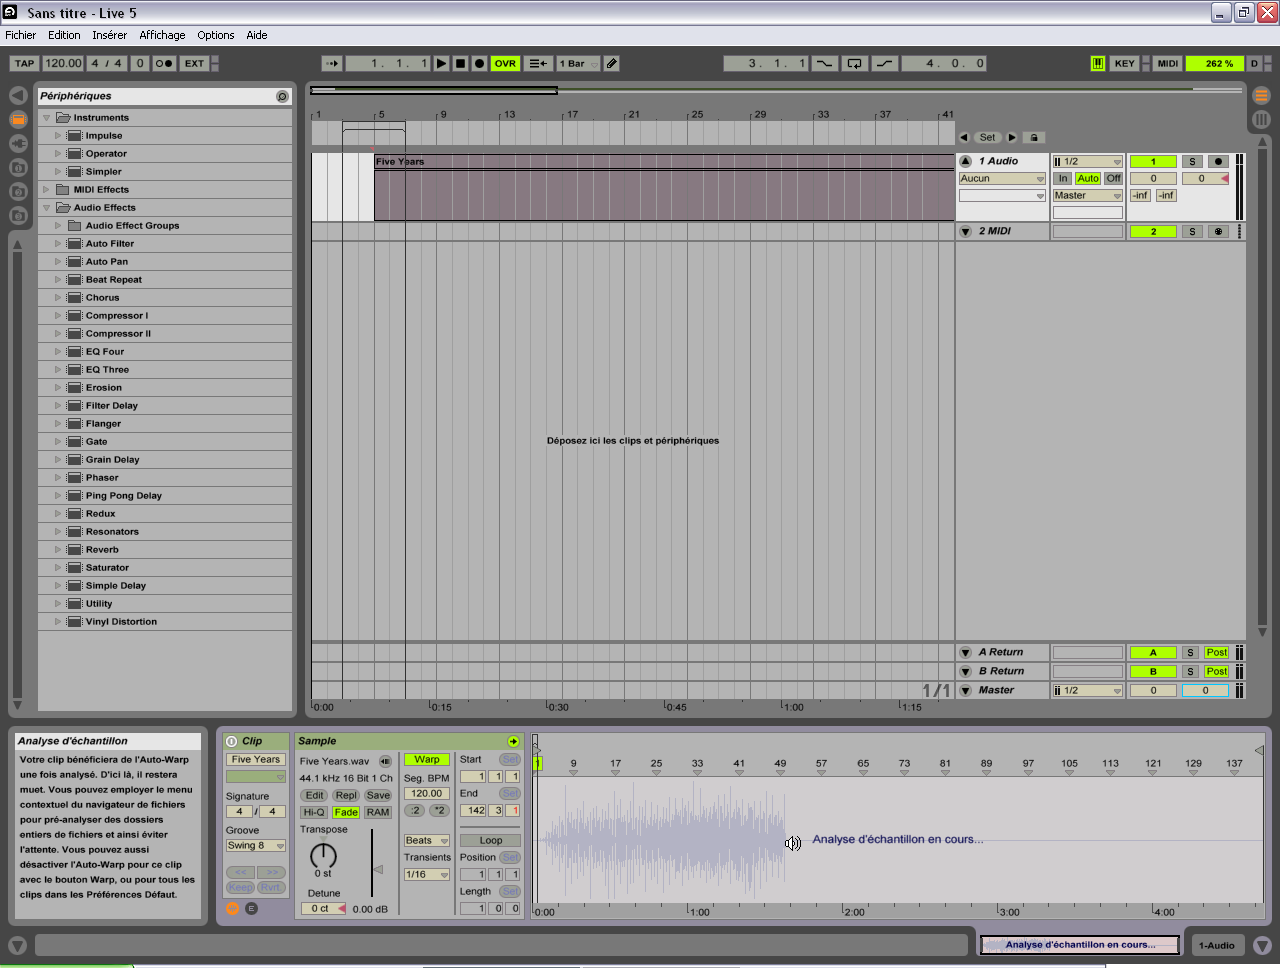
In the lower part, zoom into the track’s beginning, before the vocals begin obviously.

Put the number 1 mark on a clear mark of rhythm (try to choose the beginning of a measure), by clicking right > Set 1.1.1 Here. Double click in the grey ruler to create that mark in case it’s not here.
In general, Live detects approximatively the song’s tempo. From this point, you just have to correct the tempo fluctuations telling on which time is that kick or that snare drum. Do that on a time that’s quite shifted from where it should be:
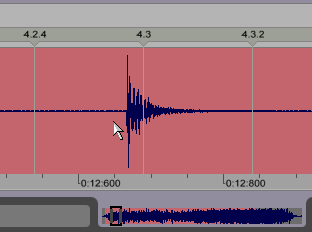
Double-click on a time that looks shifted, here 4.3, and move it on the exact time (beware to the drummer’s playing, pick a drum shot that seems as well placed as possible). You can move it even more precisely using the zoom.
Adjust the working tempo, so that it will be close enough to original approximate tempo.
If you notice at one moment every marks are shifting progressively and you don’t want to move every time over few measures, you can select the time from where the shift is happening.

Then, you define the tempo from this time.
Click right > Warp from here (you can choose between few options).
Do this ’til the end if possible, until you can at least. Move each time that seems important to you, it’s useless to do it for each measure but it’s also useless to do it too largely.
When you’re finished, you should get a forest of rhythm marks.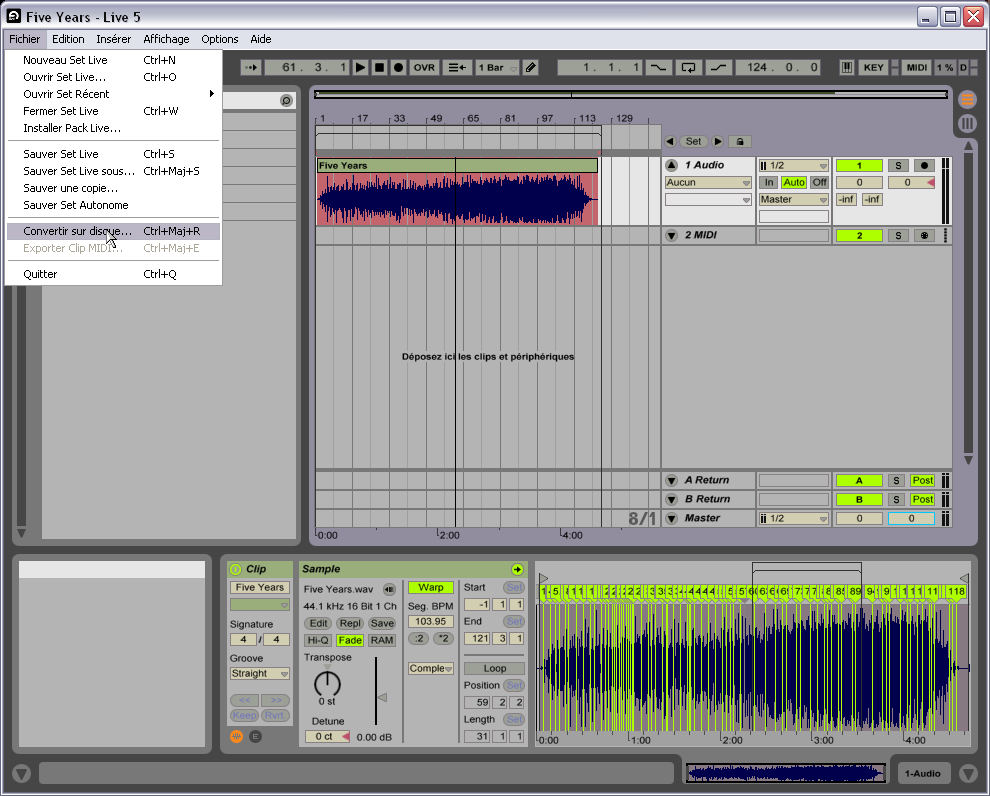
Into the arranger, stick the song to the measure marks, select a bit wider part than the song itself (see last image) and click on File > Convert to hard drive…
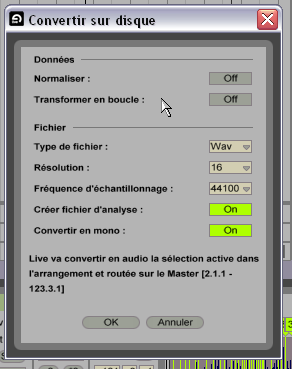
In the exportation window, select the right options (the analyse file is not mandatory and unclick Convert into mono if your source is stereophonic).
Click OK. Your file is at the tempo you’ve chosen (by the way I advise you to set right now the tempo you’re gonna work with the file).In fact, in my example, I made it backwards, and did the first steps in Audition after I set the song into the right tempo, then re-opened the exported file from Audition so that Ableton Live sets it to the right tempo. It’s just a different way to do, a bit more complicated.
On this picture, you see well the zone that’ll be exported so you don’t find yourself with a cut or too long file.
Before I discovered this technique, I used to cut a song into pieces using Audition so I could import them into Acid, but this particular technique has the advantage of preserving the unity of the song and not to have to carry a dozen of different loop files (even if the latest Acid version deals well with it).
———————————————–
Let’s go back into Audition, and open the obtained stereo file with constant chosen tempo.
Select the channnel containing the acapella then "Save the selection as" (in our case "Five Years (acapella)").
Now we’re done, he’re an acapella with the right tempo, all ready to be mashed, cut and mixed up.AdSense 336x280 -
AuthorPosts
The forum ‘Tutorials’ is closed to new topics and replies.